Running a Lean Coffee meeting
Running a Lean Coffee meeting
- Facilitator controls
- Adding topics
- Merging similar topics
- Voting on topics
- Starting discussions
- Adding and 'liking' comments on a discussion topic
- Adding actions and learnings
- Using '@' to reference participants
- Voting to end/extend discussions
- Ending the meeting
- Creating a meeting summary
- Exporting actions and learnings
- Deleting a board
- Reusing a board
Facilitator controls
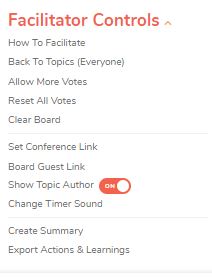
Once the board has been created, the facilitator can use the Facilitator Control menu to run the meeting. This menu is visible only to facilitators. Facilitators may add in a conference link if this was not set up earlier in the 'Customise your Meeting' screen and the 'board guest link' can be easily shared.
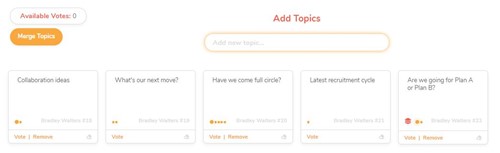
Adding topics
Once attendees have joined the meeting, they can add topics for discussion to the board. Topics can be added by facilitators, attendees and guests and may only be deleted by the topic author or by the facilitator.
The Facilitator can use the 'Add topics (everyone)' option in the Facilitator control menu to return all participants to this screen to add more topics even after discussions have started.
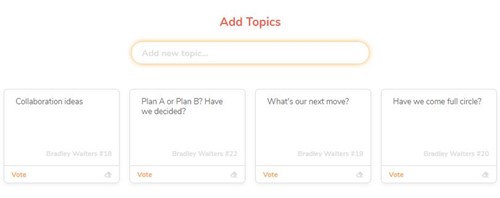
During the meeting, new topics may be added using the 'Add More Topics' button at the top of the 'To Discuss' column. Using this button will not disrupt the meeting and will only take the individual user to the 'Add topics' screen.
New topics will transfer to the 'To Discuss' column once they are entered and the 'View Discussion' or 'Continue Discussion' button is clicked to return to the meeting screen.

Hide/show topic author
The facilitator can toggle the slider in the control panel to show or hide the topic author names for an anonymous board option.
Note: the Facilitator has the option to display topic authors at any time.
Merging similar topic cards
Facilitators have the option to select similar topic cards and combine them into a new card. Any votes already cast on the original 'child' cards will be added to the new 'parent' topic card.
To merge similar topic cards, click on 'Merge' in the new topic card and select the cards you wish to combine by clicking on the tick in the centre of each topic card (this appears if you hover over the card). Click once more to deselect.
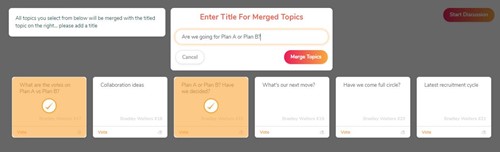
Note: You must add text into the parent topic before clicking 'Merge Topics'.
The number of child topics is displayed on the parent card. Click on this icon to see the original text and votes from the combined topics.
You may also merge further topics into the parent topic card using 'Merge additional topics' and unmerge topics by selecting 'Unmerge' from the drop down on the parent card.
Voting on topics
Once the topics have been entered, attendees can vote on which topics they would like to discuss. Initially, everyone have 3 votes. Votes can be removed and recast.
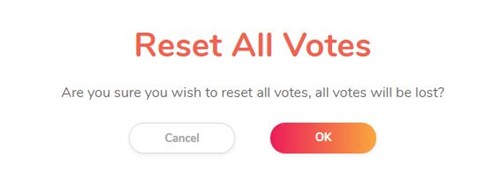
The facilitator can use ‘Reset Votes’ to restart the voting process and this will remove all votes in the current voting round.
The facilitator has the option to allow each participant a further set of votes after the 3 initial votes are cast by using the 'Allow more votes' option in the Facilitaor control menu. This option may be used repeatedly.
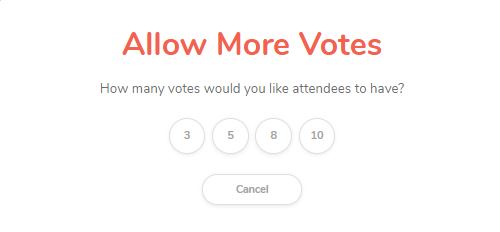
Attendees will receive a notification of the number of votes awarded to them by the facilitator
Note: If the initial 3 votes are not used, the 'Allow More Votes' functionality will top up the number of votes to the number selected. Any remaining from the first set, will be lost.

Starting discussions
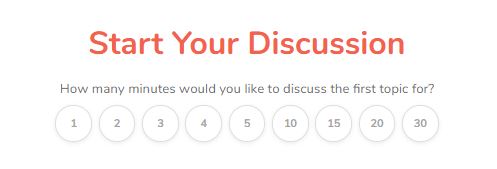
When voting is complete, the facilitator clicks the ‘Start Discussion’ button. This will move the topics into the ‘To Discuss’ column. The list is ordered with the most popular topics at the top and the topics with no votes at the bottom of the column.

The facilitator then takes a topic card from the ‘To Discuss’ column moves it into ‘Discussing’ and selects the length of initial discussion (between 1 and 30 minutes).
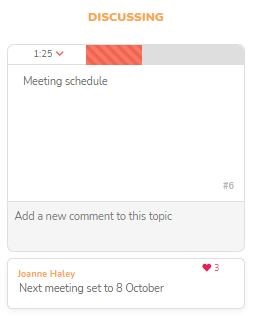
Adding and 'liking' comments on a discussion topic
Anyone can add a comment to a topic that is being discussed.
To promote user engagement and prevent duplication of comments, Participants can 'like' a comment by clicking the heart in the upper right hand corner of the comment box.
Comments, along with the number of likes, are included in the meeting summary..Comments may be edited only by the comment author but the Facilitator has the ability to delete any comment.
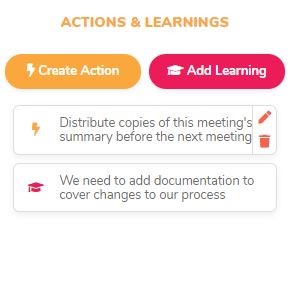
The Actions and Learnings column
All participants can add actions or learnings during the session, using the ‘Create Action’ or 'Create Learning' buttons in a dedicated column.
Actions and Learnings are not linked to a specific topic and will be recorded in the Session summary.
Attendees may edit or delete only their own actions and learnings
Using '@' to reference participants
You can use '@' when creating comments, actions or learnings to bring up a list of invitees to the board. Begin typing the first few letters of the name then select from the list to save time.
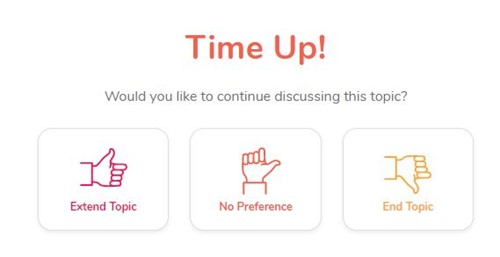
Voting to end/extend discussion topics
When the timer runs out and the alert sound is played, everyone will see this pop-up with the option to extend the discussion or move onto the next topic in the ‘To Discuss’ column.
If an attendee has no strong opinion and would like to 'go with the flow', they may select the 'No preference' option.
The end/extend/no preference votes are displayed in real time. The facilitator may call an end to the voting and either add more time to the current discussion or move on to the next topic based on the votes cast. A time extension of up to 5 minutes can be selected.
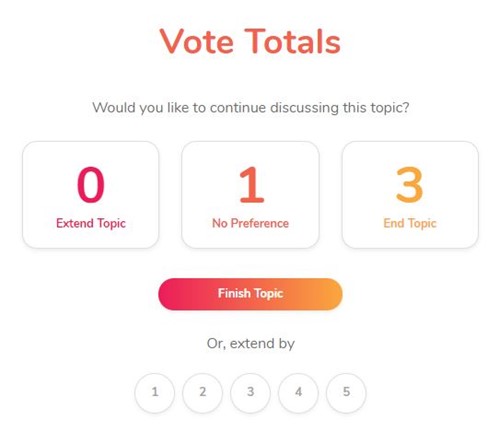
If discussions come to an end before the timer runs out, the facilitator can simply move the topic card to the 'Discussed' column.
Move across the next topic card to start the next discussion.
The alert sound played when the discussion time is up can be changed by the facilitator in the Facilitator control menu. There is a 'silence' option if you prefer your discussions not be interrupted by the alarm.
Ending the meeting
The Facilitator ends the meeting by clicking the ‘End meeting’.

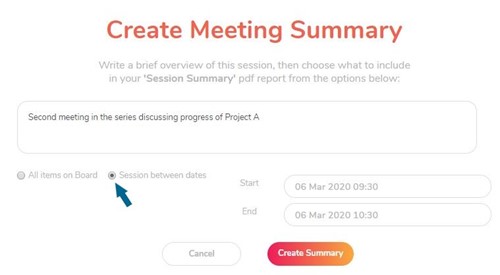
Creating a meeting summary
When the meeting is ended, a permanent record (.pdf) of the meeting can be created for distribution to everyone. The summary includes the topics which were discussed, who attended the meeting and the comments and actions added during discussion.
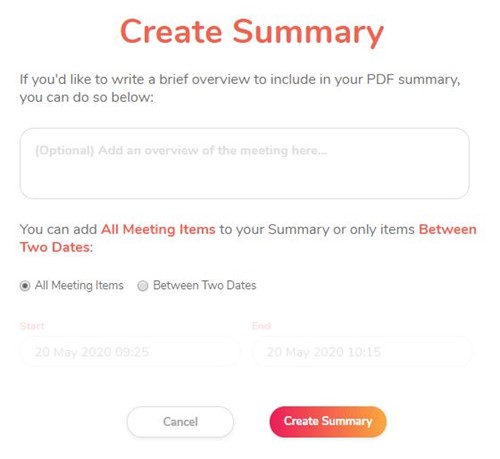
The summary may be created after clicking 'End Meeting' or later using the ‘Create summary’ option in the Facilitator control menu. The summary is created as a .pdf which is automatically downloaded onto your desktop.
Exporting actions and learnings
The facilitator can export Actions and Learnings in a .csv format – using the ‘Export Actions and Learnings’ in the Facilitator control menu.
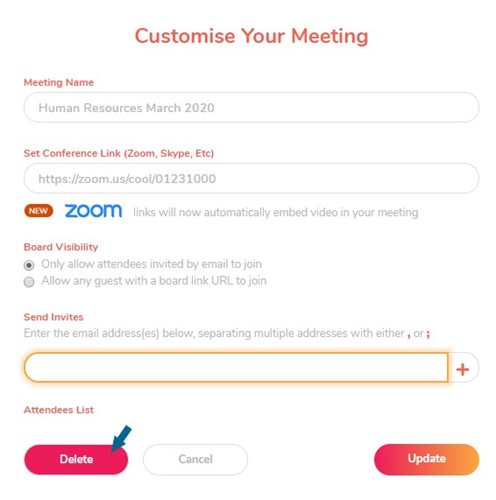
Deleting a board
You can delete a board from the boards page by clicking on the edit icon next to the board name and selecting ‘Delete’. Note that you can only delete boards that you have created.
Reusing a board
Some users prefer to go back to the same board for recurring meetings. To run a new meeting on a pre-existing board, the facilitator may reset the votes on the facilitator Control panel. To discuss the same topics, they will need to be moved back to the Topics column.
Returning to the 'Add Topics' screen will reinstate the 'Start Meeting' button to start the new meeting. When the facilitator clicks ‘End meeting’ they can choose only those topics and comments from that meeting, ignoring any topics from the previous meetings that have used the same board.
Use the 'Meeting between dates' option on the 'Create Meeting Summary' screen to specify which topics to include in the reort.